Hair falling out can feel scary, but this DIY growth mask helps calm shedding fast. With scalp-safe oils, soothing aloe, caffeine tea, and smart timing, you’ll nourish roots, reduce breakage, and support thicker-looking hair—without harsh hacks. Learn the exact recipe, routine, and a realistic 30–90 day plan.
- Understand Why Your Hair Is Falling Out—And What “Fast Results” Really Mean
- The DIY Growth Mask Formula: Safe, Effective, and Easy to Make
- Step-by-Step Application: Scalp Prep, Massage, Timing, and Rinse
- Weekly Schedule and Everyday Habits That Reduce Shedding
- Nutrition, Stress, and Sleep: Lifestyle Levers That Protect Follicles
- Troubleshooting and Common Mistakes to Avoid With Oils and Treatments
- Your 30–60–90 Day Plan and When to See a Professional
Understand Why Your Hair Is Falling Out—And What “Fast Results” Really Mean
Before you mix anything, it helps to know why hair is falling out. Hair shedding can be normal or a sign of stress on your follicles. The right mask soothes the scalp and reduces breakage quickly, but truly visible thickness takes time. This section gives you a clear, calm starting point—no fear, just facts.
Normal shedding vs. true hair loss
Most adults naturally shed 50–100 hairs per day. You’ll notice more on wash days or after protective styles, which is normal “catch-up” shedding. True hair loss feels different: widening part lines, a thinner ponytail, or round patches. A DIY mask can’t “cure” medical causes, but it can improve scalp comfort, reduce breakage, and support a healthier environment for growth.
Common, fixable triggers
- Stress spikes and illness: Major stress, fever, or viral illness can push follicles into a temporary resting phase (telogen effluvium). Shedding often rises 6–12 weeks later and settles as your body recovers.
- Tight styles and friction: Constant high ponytails, tight braids, helmets, or rough towels pull hair (traction alopecia) and break strands.
- Heat and chemical damage: Flat irons, bleach, and harsh dyes weaken the cuticle; strands snap and look like “loss.”
- Scalp irritation: Heavy fragrances, harsh cleansers, or untreated dandruff (seborrheic dermatitis) irritate follicles and increase shedding.
- Nutrition gaps or hormones: Low iron/ferritin, low vitamin D, postpartum hormone shifts, thyroid changes, and some medications can raise shed count.
What “reverses it fast” honestly means
“Fast” here means you feel and see less shedding on your brush within days to weeks because you’ve reduced breakage and calmed scalp irritation. New hair growth, however, follows biology: follicles cycle in months, not days. Expect early wins in comfort and breakage, and visible density changes over 8–12 weeks with consistent care.
Quick self-check (numbered)
- Part test: Is your part noticeably wider than 6 months ago?
- Ponytail test: Has ponytail circumference shrunk?
- Scalp comfort: Any itch, flake, or burning after products?
- Style habits: Are you wearing tight styles most days?
- Timeline: Did shedding start 6–12 weeks after illness, intense stress, birth, or a crash diet?
When DIY is appropriate
DIY masks help most when shedding is mild to moderate, scalp is intact, and irritation is low. If you notice bald patches, rapid shedding with clumps, or scalp pain, get professional guidance promptly. Your mask can still be part of a soothing routine while you seek care.
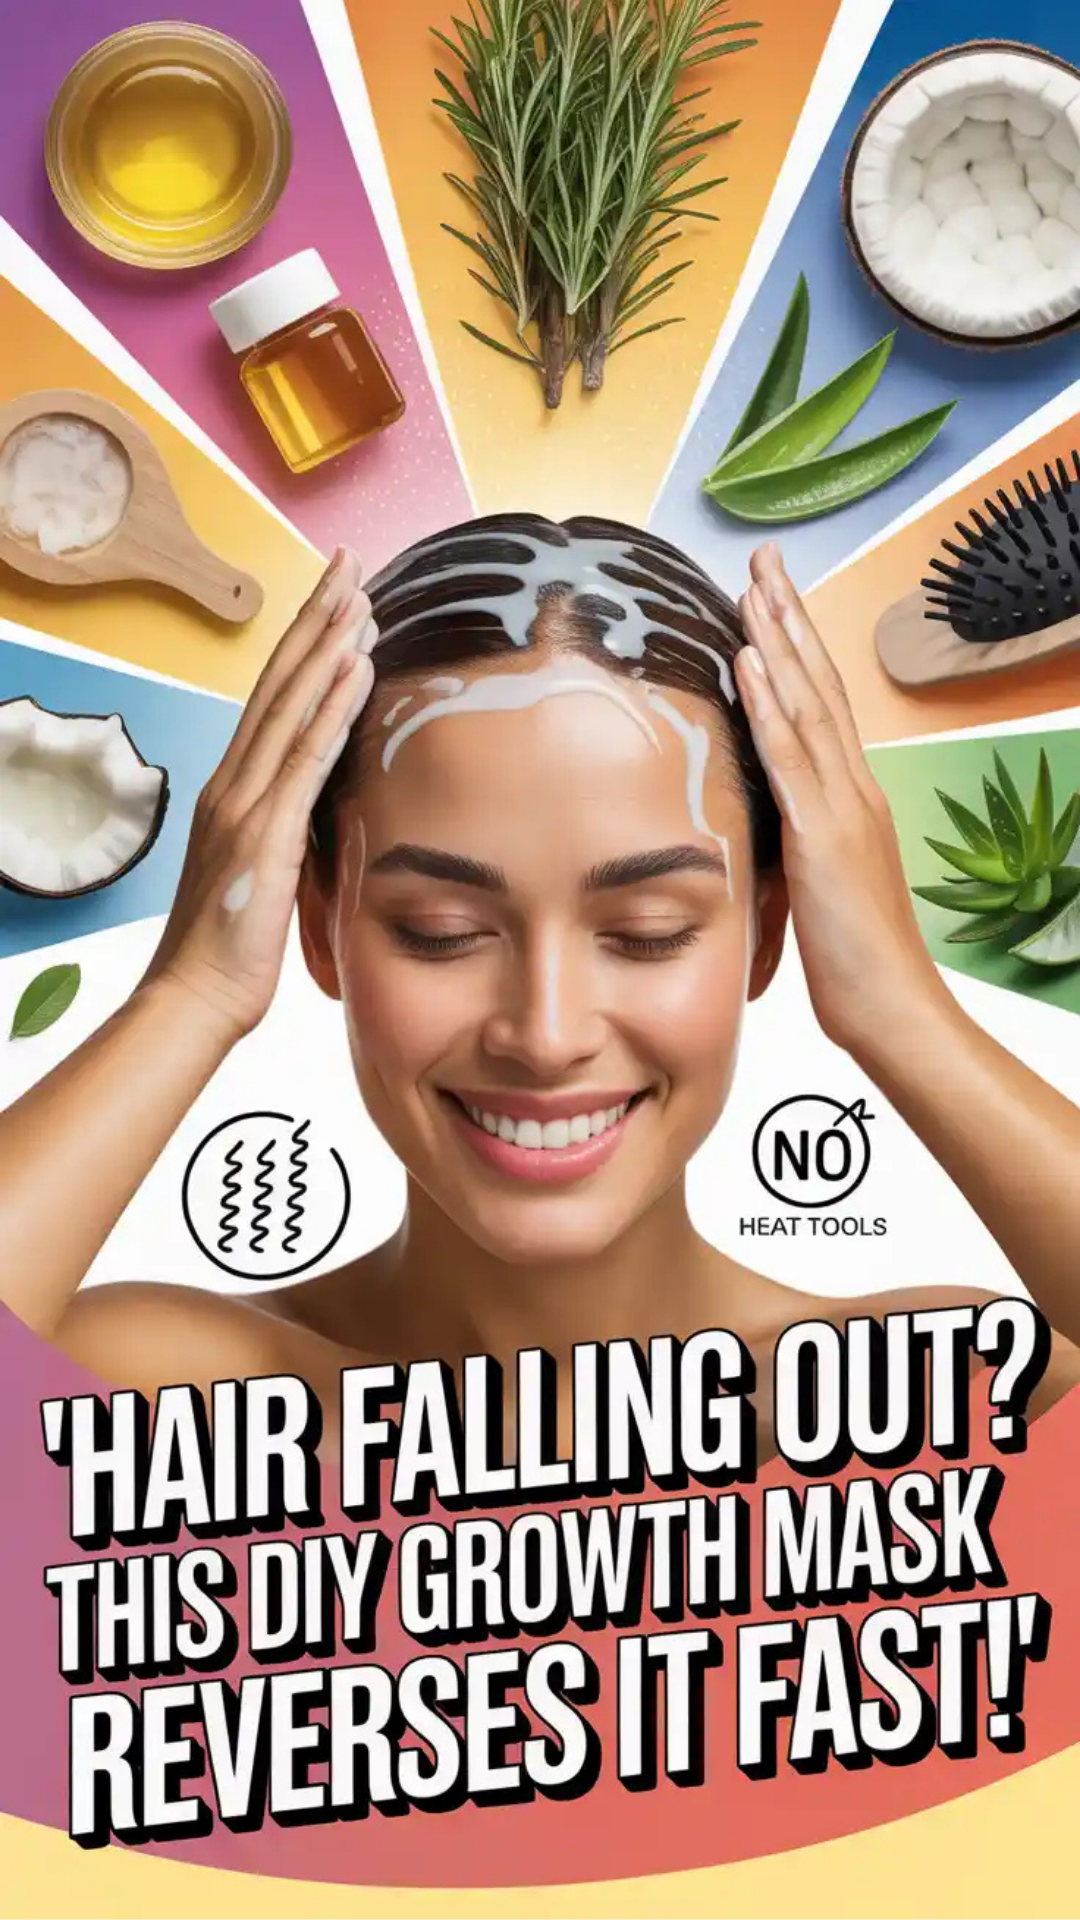
The DIY Growth Mask Formula: Safe, Effective, and Easy to Make
This mask focuses on scalp comfort + breakage prevention + microcirculation support. It uses ingredients with gentle, real-world support—no harsh actives or unsafe concentrations. You’ll also get patch-test and dilution rules so you protect your scalp barrier.
Why these ingredients
- Aloe vera gel: Lightly hydrates the scalp skin and lengths without heavy residue.
- Pumpkin seed or jojoba oil (carrier): Nourishes and helps glide for massage; jojoba resembles natural sebum; pumpkin seed oil is a popular scalp-friendly emollient.
- Rosemary essential oil (diluted): Often used in scalp blends for a refreshing feel; the key is safe dilution (we’ll cap at ~1%).
- Cooled strong green tea or instant coffee (caffeine): Caffeine rinses or leave-on tonics are widely used to support a feel of “lift” at the roots. In a mask, we use a small amount for a light, energizing step.
- Optional niacinamide serum (2–5% face-safe, fragrance-free): A pea-sized amount can be mixed in to support scalp barrier hydration. Optional only.
Safety first: dilution and patch testing
Essential oils must be diluted. For leave-on scalp contact, keep rosemary at 1% or less. That equals 3 drops per teaspoon (5 ml) of carrier oil. Always patch test 24 hours on the inner arm before scalp use. If pregnant/nursing, skip essential oils and use the aloe + carrier oil version only. Do not use on broken or infected skin.
DIY Growth Mask—Core Recipe (one use)
- Aloe vera gel (pure, unscented): 2 tablespoons
- Jojoba oil or pumpkin seed oil: 2 teaspoons
- Rosemary essential oil (optional): 6 drops total (this makes ~1% when combined with 10 ml/2 tsp carrier)
- Cooled strong green tea or coffee: 1 tablespoon
- Niacinamide serum (optional, face-safe): pea-sized
- Clean bowl + applicator brush
Method (numbered)
- In a clean bowl, whisk aloe until smooth.
- In a separate cup, stir rosemary essential oil into the carrier oil thoroughly.
- Add the oil blend to aloe; whisk until uniformly cloudy.
- Stir in cooled green tea or coffee slowly.
- Optional: blend in a pea-sized amount of fragrance-free niacinamide serum.
- Patch test on inner arm; wait 24 hours. If clear, proceed.
Texture check: You want a light gel-cream that spreads easily without dripping. If it’s too runny, add ½ tablespoon more aloe. If too thick, add 1 teaspoon tea.
Why not heavy oils all over the scalp?
Pure heavy oils can trap heat and irritants on some scalps and may worsen flaking conditions. This recipe uses aloe for slip and hydration, with modest oil and safe essential oil dilution, so your scalp can breathe while lengths get protection.
Fragrance and sensitivity notes
Choose unscented aloe and carrier oils. Rosemary EO is optional; if you’re scent-sensitive, skip it and rely on scalp massage with aloe + jojoba alone. If any tingling turns into burning, rinse immediately and scale back.
Step-by-Step Application: Scalp Prep, Massage, Timing, and Rinse
Application matters as much as ingredients. The right prep, pressure, and timing can transform your results in one use—less fallout in the shower, happier scalp, and smoother lengths.
Before you begin
- Work on detangled, dry or slightly damp hair.
- Wear a T-shirt you don’t mind getting product on.
- Have clips, a wide-tooth comb, and your bowl/brush ready.
- Plan to shampoo after masking unless you’re doing a pre-shampoo mask on very clean hair (rare). Most people do best with pre-shampoo masks.
Scalp prep (numbered)
- Part hair into four sections (ear-to-ear and front-to-back).
- If you have product buildup, gently brush the scalp with a soft, clean scalp brush for 30 seconds to lift debris (no scratching).
- Take a deep breath in for 4, out for 6–8 to relax the scalp muscles—you’ll massage more gently.
Precise application
- Using the brush, apply thin lines of mask along your parts, focusing on scalp skin rather than hair.
- Use fingertips to press and spread; don’t scrape nails across skin.
- Smooth leftover product through mid-lengths and ends to reduce friction and breakage.
Two-minute microcirculation massage (numbered)
- Place pads of fingers just above the ears.
- Press lightly, move in tiny circles for 15 seconds.
- Walk fingers up toward the crown, still circling gently.
- Move to back of head above the neck; circle another 30 seconds.
- Finish with gentle temple circles for 15 seconds. Pressure should feel soothing, never painful. You’re inviting blood flow, not “scrubbing growth into existence.”
Timing
Leave on 20–30 minutes. If you’re sensitive, start with 10–15 minutes the first time. Cover with a breathable shower cap to prevent drip; avoid heat caps if your scalp flushes easily.
Rinse and cleanse
- Rinse with lukewarm water.
- Shampoo once with a gentle, fragrance-free cleanser.
- If your hair is dry, condition lengths only.
- Blot dry with a T-shirt or microfiber towel—no rubbing.
- Detangle with a wide-tooth comb from ends upward.
Style with less fallout
Use a leave-in conditioner or a pea-sized lightweight cream on ends only. Air-dry or diffuse on low. Avoid tight hair ties today. Many people notice less hair in the drain right away because lengths slip past each other instead of snagging.
Curly/coily specifics
Apply in smaller sections. Finger-coil a little product through ends to minimize fairy knots. Rinse thoroughly at the scalp to avoid buildup that could weigh roots down.
Wavy/straight specifics
Apply the bulk of product to the scalp and mid-lengths, very little on roots if you get flat quickly. Rinse well and consider a light volumizing spray at the crown (alcohol-free) after drying.
Weekly Schedule and Everyday Habits That Reduce Shedding
Small, repeatable habits compound into visible change. Pair your mask days with gentle wash techniques, kinder styling, and friction reduction to keep every strand you already grew.
A realistic weekly plan (numbered)
- Day 1 (Sun): DIY Growth Mask + gentle shampoo + light conditioner on ends.
- Day 3 (Tue): Scalp massage 2 minutes with a few drops of carrier oil only (no EO), then shampoo.
- Day 5 (Thu): Green tea rinse after shampoo (cool to lukewarm), leave on 2 minutes, then final water rinse.
- Daily: Loose, low-tension styles; silk or satin pillowcase; detangle patiently.
Shampoo strategy
- Choose a gentle, sulfate-free shampoo or a mild cleanser labeled for sensitive scalp.
- Focus lather on scalp, not lengths. Let rinse water clean the ends.
- If you have dandruff or scalp flake, rotate in a medicated shampoo (zinc, selenium sulfide, ketoconazole) once or twice weekly as directed; apply only to scalp and rinse thoroughly. Oils alone won’t fix dandruff.
Conditioner logic
- Condition mid-lengths and ends.
- Leave on 2–3 minutes; rinse cool.
- If hair is very porous, finish with a few drops of light oil on damp ends.
Drying and detangling
- Press, don’t rub.
- Detangle in sections, ends to roots, with slip from conditioner.
- Use silicone- or satin-lined scrunchies instead of rubber bands.
Style rotation
- Alternate parts to avoid stress on the same follicles.
- Swap tight ponytails for low, loose twists or claws.
- Limit high heat; if you must heat-style, keep it under 180°C (356°F) and use a heat protectant.
Micro-habits that save strands (bullet)
- Brush before showering to reduce tangles in the water.
- Keep a detangler spray in your gym bag.
- Put hair up before driving with the seat-back rubbing your nape.
- Clip back sections for cooking to avoid steam frizz and oil splatter.
Nutrition, Stress, and Sleep: Lifestyle Levers That Protect Follicles
Follicles are tiny organs that love consistent fuel and calm signals. While a mask soothes from the outside, your plate, your breath, and your bedtime protect growth from the inside.
Protein—the non-negotiable
Hair is mostly keratin, a protein. Most adults do well with 1.0–1.2 g of protein per kilogram of body weight daily (individual needs vary—ask your clinician). Spread protein across meals so follicles get a steady supply. Examples: Greek yogurt, eggs, tofu/tempeh, lentils, fish, chicken, edamame.
Iron and ferritin
Low iron stores can raise shedding. If you suspect low energy, brittle nails, or heavy cycles, ask your clinician about checking ferritin and iron. Never start iron supplements without guidance; instead, aim for iron-rich foods (beans, lentils, fortified grains, meats) paired with vitamin C foods to support absorption.
Vitamin D, B12, zinc
These nutrients support normal hair cycling and overall health. Sunlight, fortified foods, and balanced plates help; supplements are individualized—talk to a clinician for testing and advice.
Hydration and minerals
Dehydration makes scalp skin tight and hair brittle. Aim for steady sips through the day. Include mineral-rich foods—leafy greens, nuts, seeds, beans, potatoes—to help fluid balance. Over-chugging close to bedtime disrupts sleep, which hurts growth.
Stress downshifts—twice daily
Stress shunts energy away from “beauty projects” like hair. Do eight cycles of inhale 4 / exhale 6–8 in the morning and afternoon. Shoulders down, jaw loose, tongue resting on the palate. This calms the “wired” signal that often precedes shed spikes.
Sleep is follicle fertilizer
Your body performs maintenance at night. Keep a cool, dark room, regular bedtime, and screen dimming in the last hour. If nights run hot, use breathable bedding and tie hair in a loose, satin-scrunchie pineapple to reduce friction.
Smart caffeine timing
Love coffee? Enjoy it after breakfast so protein and fiber buffer stress hormones. Too-late caffeine can fragment sleep; consider a noon cutoff if evenings feel “wired.”
Simple plate guide (numbered)
- Protein at each meal (palm-size).
- Colorful vegetables and fruit for antioxidants.
- Slow carbs like oats, quinoa, potatoes, or brown rice.
- Healthy fats: olive oil, avocado, nuts, seeds.
- Hydration: a glass at meals and steady sips between.
Troubleshooting and Common Mistakes to Avoid With Oils and Treatments
It’s easy to overdo hair care. This section keeps you safe, effective, and consistent—no heavy hands, no itchy surprises.
Don’t use undiluted essential oils on the scalp
Always dilute rosemary (or any essential oil) to ≤1% in a carrier oil. More is not better. If you feel burning or see redness, rinse with a gentle cleanser and skip essential oils for now.
Avoid masking over active scalp flares
If you have painful bumps, thick yellow scales, or weeping areas, pause DIY masks and use a medicated scalp wash as directed. Once calm, reintroduce the mask gently.
Watch out for buildup
If roots feel coated, switch to less oil, more aloe, and extend time between heavy stylers. Clarify once every 2–4 weeks with a gentle clarifying shampoo if you use a lot of products.
Don’t confuse breakage with loss
Short, uneven hairs on shoulders and sink often signal breakage, not root shedding. Breakage improves quickly with gentle detangling, heat limits, and a tiny bit of oil on ends only.
Patch test every new mix
Even “natural” ingredients can irritate. Inner-arm test for 24 hours. If you’re reactive, try aloe + jojoba alone; results still come from massage + slip + reduced friction.
Postpartum and seasonal shifts
Postpartum shedding typically peaks around 3–4 months after birth and eases by 6–12 months. Seasonal shedding (often late summer/fall) is usually mild and temporary. Consistency—not panic—helps.
Tool hygiene
Wash brushes and combs weekly. Residue and skin oils on tools re-deposit onto the scalp and weigh roots down.
Color and chemical services
Space out bleach sessions and perms. If you color, schedule the mask 48 hours before salon day to soothe the scalp and 1 week after to help lengths. Avoid masking right after coloring to prevent interfering with dye set.
The “less-but-better” rule (bullet)
- One gentle shampoo
- One conditioner you love
- One lightweight leave-in
- One carrier oil
- Optional rosemary EO for scalp (diluted) Rotate only if needed; stability beats novelty.
Your 30–60–90 Day Plan and When to See a Professional
Hair responds to consistency. Use this plan once; keep what works best for you. Along the way, know the red flags that deserve medical attention.
30 days: calm and control
- Goal: Less shedding in the shower and on the brush; scalp feels quiet.
- Actions: Mask 1–2× weekly, green tea rinse once weekly, gentle shampoo routine, low-tension styles, breath breaks twice daily.
- Measure: Count hairs from one brush session weekly or photograph your part under the same light with your phone.
60 days: strength and slip
- Goal: Less breakage; ends feel smoother; fewer snags.
- Actions: Continue masking weekly; trim dusting of split ends if needed; clarify lightly once this month if you use heavy products.
- Measure: Ponytail circumference (wrap the same ribbon; mark progress).
90 days: density you can feel
- Goal: Baby hairs along the hairline look livelier; overall volume feels steadier.
- Actions: Keep routine; consider adding a scalp-friendly tonic on non-mask nights (aloe + water spritz or caffeine tonic).
- Measure: Same-angle progress photo; compare to Day 1.
When to seek professional guidance
- Rapid shedding with clumps, bald patches, or eyebrow/eyelash thinning
- Scalp pain, pustules, or thick scales that don’t improve with gentle care
- Sudden hair loss after starting a new medication
- Persistent shedding beyond 6 months despite a consistent routine A dermatologist or trichologist can check your scalp, review labs (iron/ferritin, thyroid, vitamin D), and discuss additional options. Evidence-based therapies—like minoxidil, low-level light therapy, or targeted prescriptions—can complement your gentle home routine when appropriate.
How to talk to your clinician (numbered)
- Bring timeline notes (stress, illness, postpartum, new meds).
- List your products and how often you use them.
- Share photos of your part from Day 1 and today.
- Ask about labs: ferritin, thyroid, vitamin D, B12, zinc (as appropriate).
- Discuss whether your current plan can pair with in-office options.
Mindset that wins
Your hair is not failing; it’s responding. You’re removing friction, feeding follicles, and calming the system that tells hair to rest. The mask is your ritual; the routine is your power.
Frequently Asked Questions
Will this DIY mask regrow hair on bald spots?
It can soothe the scalp and reduce breakage, which makes hair look fuller, but it doesn’t “cure” medical hair loss. For bald patches, rapid shedding, or scalp pain, see a clinician. Your DIY routine can support comfort alongside professional treatment.
How often should I use the mask?
Start once weekly. If your scalp tolerates it well and hair is very dry, consider twice weekly for a month, then settle at weekly. More often isn’t better—over-occluding the scalp can backfire.
Can I skip rosemary essential oil?
Yes. Use aloe + jojoba or pumpkin seed oil alone and focus on gentle massage. If you include rosemary, keep dilution at ≤1% and patch test first.
Is coffee or green tea better in the mask?
Both are fine. Green tea is milder in scent; coffee feels more “energizing” to some. Always cool before mixing. If you’re scent-sensitive, rely on aloe + carrier oil and add the tea as a separate post-shampoo rinse.
When should I expect to see changes?
Comfort and reduced breakage can show in the first week. Visible fullness typically requires 8–12 weeks of consistent care, photos in the same light, and kinder styling.